Table of Contents
What is this post about?
This post shows how to setup the IdentityServer4 in combination with an ASP.NET Core Web API using OpenID Connect and OAuth. I will show you two different ways of authorization.
The first will be the server-to-server communcation with a secured API.
The second will be an extension for the identity server to have a custom user authentication and role based API access.
I’m going to show you more about authorization rather than about authentication. If you are interested in how the OAuth2.0 authentication flow works, you can visit the offical OAuth website here.
Authentication and Authorization – What’s the difference?
Authentication means the process used to determine whether a user is who he claims to be.
Once authenticated, authorization determines which resources a given user should be able to access, and what they’re allowed to do with those resources.
Development Environment and Source
The demo solution runs successfully with the following tools and SDK’s installed.
- Visual Studio 2019 Community
- .NET Core SDK 3.1
- IdentityServer4 3.1.2
The source code can be found at github under https://github.com/christopher-klein/ASPNETCore.IdentityServerDemo
Creating the IdentyServer4 Authentication Service
Basic setup
In order to create the token server I created a new empty ASP.NET Core WebApp and installed the NuGet package https://www.nuget.org/packages/IdentityServer4/3.1.2/.
To make use of the identity server you have to add the server services which are coming within the package. Modify our Startup.cs in the ConfigureServices() method.
public void ConfigureServices(IServiceCollection services)
{
    services.AddIdentityServer()
            .AddDeveloperSigningCredential() // do not use in production
            .AddInMemoryApiResources(ResourceManager.Apis)
            .AddInMemoryClients(ClientManager.Clients)
            .AddInMemoryIdentityResources(IdentityManager.IdentityResources)
            .AddResourceOwnerValidator<ResourceOwnerPasswordValidator>()
            .AddProfileService<ProfileService>();

    // Define Clients, ApiResources and IdentityResources in appsettings.json when running in
    // production so you can easily manage other client authentications
}
If you’re currently following these steps at home, don’t worry. All the errors will be fixed soon 🙂 and you will understand what these lines of code do. After adding the IdentityServer services you have to apply the usage of the server in your Configure() method.
app.UseIdentityServer()
Define API Resources
To allow clients to request access tokens for APIs, you need to define API resources. In this case we have got only one API resource because we just want to use our weather API.
internal static class ResourceManager
{
    public static IEnumerable<ApiResource> Apis = new List<ApiResource>
        {
            new ApiResource("app.api.weather",
                "Weather API", new []
                {
                    JwtClaimTypes.Name,
                    JwtClaimTypes.Email,
                    JwtClaimTypes.Role,
                    JwtClaimTypes.WebSite
                })
        };
}
So we created an API Resource. When we setup user claims here the profile service will be able to issue the requested claims we listed here. Additionally you can transport more claims using the identity resources I will get into later.
Define Identity Resources
Identity resources are data like user ID, name, or email address of a user. These claims will then be included in the identity token for the user. If you want to use custom claim types u can use custom identity resources. In this scenario we only need standard claims from OpenId() and Profile().
Which claims are transported in the standard scopes is documentated in the openid specs.
internal static class IdentityManager
{
    // identity resources to transport claims
    public static IEnumerable<IdentityResource> IdentityResources = new List<IdentityResource>
    {
        new IdentityResources.OpenId(),
        new IdentityResources.Profile()
    };
}
Define Clients
Clients represent applications that can request tokens from the IdentityServer. So we need two clients here. One for the server to server communication and one for the default user access. The grant type ClientCredentials is the simplest type of authentication. We just need a client id and a client secret to get a valid token. The grant type ResourceOwnerPassword represents the OAuth 2.0 resource owner password credential grant (aka password). Here we are able to pass a username and a password to the identity server for authentication.
internal static class ClientManager
{
    public static IEnumerable<Client> Clients = new List<Client>
        {
                new Client
                {
                     ClientName = "Some Process",
                     ClientId = "app1_machine_to_machine",
                     AllowedGrantTypes = GrantTypes.ClientCredentials,
                     ClientSecrets = { new Secret("verysecret".Sha256()) },
                     AllowedScopes = { "app.api.weather" }
                },
                new Client
                {
                    ClientName = "WebApp Client",
                    ClientId = "app1_user_auth",
                    ClientSecrets = new [] { new Secret("secret".Sha256())  },
                    AllowedScopes = new [] { "app.api.weather"},
                    AllowedGrantTypes = GrantTypes.ResourceOwnerPassword

                }
        };
}
Custom IResourceOwnerPasswordValidator
I want to do the user validation by myself. For this we have to write our own user validator. If you work with EF and the default .NET Identity you can work with your identity manager UserManager as well. In this case the user ID is always stored in the claim type sub.
internal class ResourceOwnerPasswordValidator : IResourceOwnerPasswordValidator
   {

       public ResourceOwnerPasswordValidator()
       {
       }

       public Task ValidateAsync(ResourceOwnerPasswordValidationContext context)
       {
           var user = context.UserName;
           //custom user verification
           //you can use the Asp.NET Identity UserManager too (too look for users in default database)
           if (user != null
               && user == "bob")
           {
               context.Result = new GrantValidationResult(
                   "ID1",
                   "custom",
                   new List<Claim>
                   {
                       new Claim(JwtClaimTypes.Name, "Bob Bobby"),
                       new Claim(JwtClaimTypes.Email, "bob@mail.com"),
                       new Claim(JwtClaimTypes.Role,"admin"),
                       new Claim(JwtClaimTypes.WebSite,"github.com")
                   });
           }
           else if (user != null
               && user == "alice")
           {
               context.Result = new GrantValidationResult(
                   "ID2",
                   "custom",
                   new List<Claim>
                   {
                       new Claim(JwtClaimTypes.Name, "Alice Ally"),
                       new Claim(JwtClaimTypes.Email, "alice@mail.com"),
                       new Claim(JwtClaimTypes.Role,"user"),
                       new Claim(JwtClaimTypes.WebSite,"github.com")
                   });
           }
           else
           {
               context.Result = new GrantValidationResult(TokenRequestErrors.InvalidGrant,"invalid custom credential");
           }

           return Task.CompletedTask;
       }
   }
I’m just checking the incoming username. You won’t do that in your code but it is just to show how the role claims are working.
Custom IProfileService
It is not practical to put all of the possible claims needed for users into the token cookie, so the IdentityServer defined an extension for allowing claims to be dynamically loaded as needed for a user. In order to transport the claims we request in our API resource we have to forward them inside the user context.
public class ProfileService : IProfileService
{
    public Task GetProfileDataAsync(ProfileDataRequestContext context)
    {
        // example of getting client id
        var id = context.Client.ClientId;

        // sub claim is default for userid when using .net identity manager
        var userId = context.Subject.Claims.FirstOrDefault(x => x.Type == "sub");

        // adjust claims
        context.IssuedClaims = context.Subject.Claims.Where(x => context.RequestedClaimTypes.Contains(x.Type)).ToList();

        return Task.CompletedTask;
    }

    public Task IsActiveAsync(IsActiveContext context)
    {
        // normally you gotta search your user
        // and determine if he is active or not
        context.IsActive = true;
        return Task.CompletedTask;
    }
}
That’s it! We have successfully created an identity server with two supported types of authentication.
Let’s test our server
I am using Postman to test the token server. All request I am doing have been exported and are present in the github repository.
Get the openid-configuration
The identity server publishes different endpoints. One endpoint is the .well-known/openid-configuration. We can see all public server settings here. When we start a http GET request to the endpoint https://localhost:44355/.well-known/openid-configurationwe receive the following results:
{
    "issuer": "https://localhost:44355",
    "jwks_uri": "https://localhost:44355/.well-known/openid-configuration/jwks",
    "authorization_endpoint": "https://localhost:44355/connect/authorize",
    "token_endpoint": "https://localhost:44355/connect/token",
    "userinfo_endpoint": "https://localhost:44355/connect/userinfo",
    "end_session_endpoint": "https://localhost:44355/connect/endsession",
    "check_session_iframe": "https://localhost:44355/connect/checksession",
    "revocation_endpoint": "https://localhost:44355/connect/revocation",
    "introspection_endpoint": "https://localhost:44355/connect/introspect",
    "device_authorization_endpoint": "https://localhost:44355/connect/deviceauthorization",
    "frontchannel_logout_supported": true,
    "frontchannel_logout_session_supported": true,
    "backchannel_logout_supported": true,
    "backchannel_logout_session_supported": true,
    "scopes_supported": [
        "openid",
        "profile",
        "app.api.weather",
        "offline_access"
    ],
    "claims_supported": [
        "sub",
        "name",
        "family_name",
        "given_name",
        "middle_name",
        "nickname",
        "preferred_username",
        "profile",
        "picture",
        "website",
        "gender",
        "birthdate",
        "zoneinfo",
        "locale",
        "updated_at",
        "email",
        "role"
    ],
    "grant_types_supported": [
        "authorization_code",
        "client_credentials",
        "refresh_token",
        "implicit",
        "password",
        "urn:ietf:params:oauth:grant-type:device_code"
    ],
    "response_types_supported": [
        "code",
        "token",
        "id_token",
        "id_token token",
        "code id_token",
        "code token",
        "code id_token token"
    ],
    "response_modes_supported": [
        "form_post",
        "query",
        "fragment"
    ],
    "token_endpoint_auth_methods_supported": [
        "client_secret_basic",
        "client_secret_post"
    ],
    "id_token_signing_alg_values_supported": [
        "RS256"
    ],
    "subject_types_supported": [
        "public"
    ],
    "code_challenge_methods_supported": [
        "plain",
        "S256"
    ],
    "request_parameter_supported": true
}
Request token for server to server communication
The default identity server endpoint to request a token is /connect/token. For our client app1_machine_to_machine we have to do a http post to the endpoint with the grant_type=client_credentials.
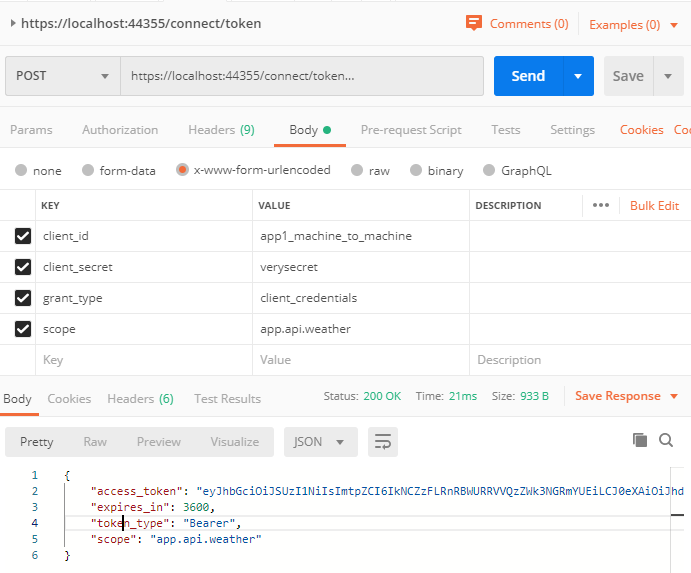
The access_token can now be used in order to communicate with our API.
Request token for a user
For our client app1_user_auth we have to do a http post to the endpoint with the grant_type=password.

Nice! We created a working identity server serving access tokens to valid users and client applications!
Let’s continue.
Creating the secured Web API
Create a new ASP.NET Core Web Application (API). I used the default .NET Core API template WeatherForecast.
First of all you have to install the NuGet package https://www.nuget.org/packages/IdentityServer4.AccessTokenValidation/3.0.1/. This package brings everything we need in order to check authentication against the identity server. After installing the package go to your Startup.cs into the Configure() method and add authentication.
app.UseAuthentication();
Now go to the ConfigureServices() method and configure your identity server authentication. When activited, all requests will be validated throught the configured authority.
services.AddAuthentication(IdentityServerAuthenticationDefaults.AuthenticationScheme)
              .AddIdentityServerAuthentication(options =>
              {
                  options.Authority = "https://localhost:44355";
                  options.ApiName = "app.api.weather";
              });
Setup authorization
Now all requests will be forwared to the identity server when your API requires authentication. In order to achieve this you simply have to insert a data annotation above your API controller.
[ApiController]
[Authorize]
[Route("[controller]/[action]")]
public class WeatherForecastController : ControllerBase
Let’s test
Go into your postman console and try a http GET to your WeatherForecastController via https://localhost:44366/WeatherForecast/GetWeatherData. If everything is configured correct you will receive a 403 forbidden error.
In order to access the API data we should get a new token from the server (as API or User). Now pass the access token value inside your request.

Great! Our authentication works!
Authorize against roles
In our identity server we have set different roles to different users. In order to validate a users role (claimtype = role) just modify the data annotation. I created a new action which will give me alle the users claims to validate that they’re all present.
[HttpGet]
[Authorize(Roles = "admin")]
public IEnumerable<SimpleClaim> GetSecretClaimData()
{
    var claimsIdentity = User.Identity as ClaimsIdentity;

    //cast into simplier model type
    List<SimpleClaim> returnClaims = new List<SimpleClaim>();
    foreach(var claim in claimsIdentity.Claims)
    {
        returnClaims.Add(new SimpleClaim()
        {
            Type = claim.Type,
            Value = claim.Value
        });
    }

    return returnClaims;
}
Now only users within the role “admin” can access this API endpoint.
If you want to use more complex user authorization you should make use of custom policies.
Time for Bob!
Go ahead and get an access token for the admin user “Bob”. Request the API with the access token under https://localhost:44366/WeatherForecast/GetSecretClaimData. The result is a list of all available claims.
[
    {
        "type": "nbf",
        "value": "1583701123"
    },
    {
        "type": "exp",
        "value": "1583704723"
    },
    {
        "type": "iss",
        "value": "https://localhost:44355"
    },
    {
        "type": "aud",
        "value": "app.api.weather"
    },
    {
        "type": "client_id",
        "value": "app1_user_auth"
    },
    {
        "type": "sub",
        "value": "ID1"
    },
    {
        "type": "auth_time",
        "value": "1583701123"
    },
    {
        "type": "idp",
        "value": "local"
    },
    {
        "type": "name",
        "value": "Bob Bobby"
    },
    {
        "type": "email",
        "value": "bob@mail.com"
    },
    {
        "type": "role",
        "value": "admin"
    },
    {
        "type": "website",
        "value": "github.com"
    },
    {
        "type": "scope",
        "value": "app.api.weather"
    },
    {
        "type": "amr",
        "value": "custom"
    }
]
Conclusion
We successfully created an IdentityServer with two types of authentication, custom authorization and secured a Web API.
Happy coding!
Comments